Introduction
Are you looking to build a solar power station on a budget? Whether you’re just starting out or want to create a simple, cost-effective system, this guide is for you. Here, we’ll walk you through building the cheapest solar power station, perfect for those who want to dip their toes into renewable energy without breaking the bank.
What You’ll Need
To create your budget-friendly solar power station, you’ll need a few key components:
PWM Solar Charge Controller: The most affordable type of solar charge controller, this isn’t an MPPT controller, which is slightly more expensive. PWM controllers are simple and available in various voltage ratings like 12V, 24V, 36V, and 48V. The appearance and functionality may vary, but they all share the same basic purpose: to regulate the charging process of your batteries.
Solar Panels: You’ll need solar panels to generate electricity. The most common types are monocrystalline (usually gray) and polycrystalline (bluish with speckles). Choose based on your budget and power needs.
Batteries: For the cheapest setup, automotive batteries are a good option. They’re not the best for solar energy storage, but they are affordable. For a 12V system, you’ll need one battery; for a 24V system, two; and so on.
Inverter: To convert the DC power from your batteries into AC power for your home, you’ll need an inverter. Choose one based on both the voltage (e.g., 12V to 220V) and the load capacity you need. Remember to consider the type of devices you’ll power, especially if they have motors like refrigerators or gas boilers.
Step 1: Choose Your PWM Solar Charge Controller
The PWM controller is the heart of your solar power station. These controllers are simple and affordable, and they come with various features like displays and USB ports. The key is to choose one that matches your system’s voltage and amperage requirements.
Step 2: Select Your Solar Panels
When selecting solar panels, ensure they are compatible with your controller. Pay attention to the maximum voltage and current ratings to avoid overloading your system. Panels should have a working voltage and current that falls within the safe operating range of your controller.
Step 3: Choose Your Batteries
For this budget setup, automotive batteries are the most cost-effective option. They might not be the most efficient for solar use, but they work well enough for a simple system. Remember, the number of batteries you need depends on your system’s voltage.
Step 4: Pick the Right Inverter
Your inverter should match both the voltage of your battery bank and the power demands of your appliances. A good rule of thumb is to choose an inverter with twice the wattage of your total expected load. This ensures that even if you add more devices later, your system will handle the extra load.
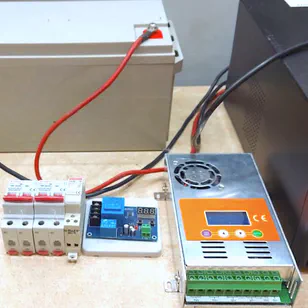
Step 5: Assemble Your System
Here’s how to put everything together:
Connect the Solar Panels: Start by connecting the solar panels to your PWM controller. Ensure the connections are correct – plus to plus and minus to minus.
Connect the Batteries: Next, connect your batteries to the controller. Again, make sure to match the polarities correctly.
Connect the Inverter: Finally, connect the inverter to the batteries, ensuring the positive and negative terminals align properly. The inverter will have an AC output where you can plug in your devices.
Test the System: Once everything is connected, power on your system and test it by running a few appliances. Make sure the controller, inverter, and panels are all functioning as expected.
Final Tips for Your Solar Power Station
Consider Higher Voltage Systems: A 48V system is generally more efficient than lower voltage systems. It reduces the need for thicker cables and allows for better panel compatibility.
Monitor System Performance: Regularly check your controller and inverter to ensure everything is running smoothly. Pay attention to voltage and current readings to avoid overloading the system.
Upgrade as Needed: As your energy needs grow, you can upgrade components like the inverter or add more batteries to increase your system’s capacity.
Conclusion
Building a solar power station doesn’t have to be expensive. With the right components and a bit of know-how, you can create an affordable and efficient system that meets your energy needs. Follow this guide, and you’ll be on your way to harnessing the power of the sun without breaking the bank.